Powered By Blogger
Showing posts with label chili powder. Show all posts

Friday, January 13, 2017

Shakshuka


I needed a recipe that was not only quick and tasty, but wanted it to be simple and clean too - plus who doesn't love breakfast for dinner?  Shakshuka is a dish usually eaten for breakfast in Israel, although with a side salad it is a lovely light vegetarian evening meal.  Made in one skillet it hails from Libya and has many variations.  This version included items that I had available in my pantry!

SHAKSHUKA
 Ingredients:
1 tbsp extra virgin olive oil
1 diced onion
1 clove garlic, minced
1 seeded and diced red or green pepper
28oz can diced tomatoes (I use low-sodium)
1 can tomato paste
1 tsp chili powder
1 tsp ground cumin
1 tsp paprika
Pinch of cayenne
Pinch of sugar (optional)
Salt & pepper, to taste
5 - 6 eggs
1 tbsp chopped, fresh parsley
  • Heat olive oil in skillet.  Saute onions and peppers over medium high, stirring often, until softened.  Add garlic; saute for an additional minute.

  • Add tomatoes, tomato paste, and spices.  Stir to combine well.  Simmer over medium heat for 5 to 7 minutes, or until it reduces and thickens.  Add salt, pepper and sugar to taste.
  • Crack the eggs, one at a time, directly over the tomato mixture, spacing out evenly.
  • Cover the skillet and allow to simmer for 10 to 15 minutes or until the eggs are cooked and the sauce has really thickened.
  • Turn off heat, sprinkle chopped parsley over entire dish.
  • Serve with toasted flat bread
  • ENJOY! 

Monday, June 8, 2015

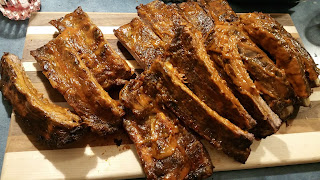
Rib Dry Rub and BBQ Sauce


Pork ribs


Friends of ours hold an annual rib cook off where we all compete for first place and bragging rights!  The dry rub and BBQ sauce that we came up with this year only got us 2nd place at the rib cook off, but 1st place at our family table.  They work perfectly for both pork and beef ribs - so if you are a lover of a traditional BBQ sauce flavour with your ribs, this is for you!!!
Beef ribs

RIB DRY RUB & BBQ SAUCE
Ingredients (Dry Rub)
3 tbsp Kosher salt
2 tbsp chili powder
2 tbsp packed, dark brown sugar
1 tbsp smoked paprika
1 tbsp hot paprika
1 tbsp garlic powder
1 tbsp onion salt
2 tsp ground mustard
1tsp black pepper
Ingredients (BBQ Sauce)
3 tsp oil
1 finely diced cooking onion
2 finely diced garlic cloves
1 cup ketchup
1/2 cup apple cider vinegar
1/4 cup maple syrup
1 tsp liquid smoke
1 tsp Worcestershire sauce
1 tsp blackstrap molasses
1/4 tsp salt
1/4 tsp black pepper
2 large racks of beef or pork ribs

BBQ sauce prior to pureeing

Pureed BBQ sauce - YUMMY!


  • Pat ribs dry with paper towel.  Flip rack over so back side of the ribs is facing up.  Using a butter knife, gently ease the thin silverskin from the back of the bones.  Using a paper towel, grasp the silverskin and pull off of the bones and discard.  This will ensure your ribs are more tender and cook evenly.
  • Combine all ingredients for the dry rub and rub the back, front and edges of the ribs thoroughly.  Wrap in plastic wrap and refrigerate for 2 to 24 hours (24 hours is recommended)
  • Remove ribs from fridge and bring to room temperature. Tightly wrap ribs in foil and place in a 250F oven on a cookie sheet, for 2 to 3 hours (pork ribs), or 3 to 4 hours (beef ribs).
  • Meanwhile, in a large skillet, heat oil and saute the onions for the sauce over medium low heat until golden brown.  Add garlic and stirring constantly to prevent burning, saute for approximately 5 minutes longer.
  • Add rest of ingredients, combine and simmer for 10 mins.  Let cool slightly and put into a blender.  Puree until smooth.
  • After the ribs have cooked in the oven for the desired amount of time, open the foil and brush ribs all over with the BBQ sauce.
  • Place on a BBQ grill over medium heat, or back into the oven.  As the sauce caramelizes, brush more on and remove from heat.  
  • Let the rack rest for 10 mins before cutting into either one or two bone servings.  
  • Serve with a side dish of the BBQ (in case anyone wants saucier ribs!!)
  • ENJOY!
*I have found that stating the ribs in the oven and finishing on the grill provides not only the best flavour, but fall off the bone ribs!


Saturday, November 1, 2014

Acorn Squash Soup with Warm Spices


This soup is the perfect taste of fall; squash, cinnamon and cumin are set off with the tang of lime juice.  Delicious and filling, low in calories, high in fibre and vitamin A!  Try this super economical dish tonight!!!

ACORN SQUASH SOUP WITH WARM SPICES
Ingredients:
 1 kg acorn squash
2 tbsp olive oil
1/4 tsp salt
1 medium cooking onion, diced
2 garlic cloves, minced
1/2 tsp chili powder
1/2 tsp ground cumin
1/4 tsp ground cinnamon
3 cups low-sodium vegetable broth
1 cup water
1/4 cup 35% cream (I used goat milk)
1 tbsp fresh lime juice
1/2 cup pepitas (young pumpkin seeds - optional)
  • Peel squash, cut in half and scoop out seeds.  Cut squash into 1" cubes (approximately 7 cups worth)
  • Heat a large pot over medium heat.  Add olive oil (or coconut or grapeseed), then onions. Saute until onions soften; approximately 5 minutes.  Add garlic, spices and remaining salt.  Cook for 1 minute.  Add cubed squash and cook 2 more minutes.  Add broth and water.  Bring to a boil and reduce heat to medium.  Simmer, partially covered, until squash is tender (approximately 30 minutes).
  • Puree mixture in pot using a hand blender, or in batches using an upright blender.  Stir in cream and lime juice.  Ladle soup into bowls and garnish with pepitas.
  • ENJOY!

White Fish Cakes with Lemon-Chili Mayo


This photo really doesn't do this dish justice - when I make these again (because I absolutely will!), I will take a better quality shot.  These are not only easy and economical but extremely healthy.  I made this recipe gluten-free by using rice bread crumbs instead of regular breadcrumbs.  Thank you "Canadian Living" magazine for yet another winner!

WHITE FISH CAKES WITH LEMON-CHILI MAYO
Ingredients:
1 rib celery, coarsely chopped
2 green onions, coarsely chopped
1/4 cup fresh parsley leaves
450g firm white-fleshed fish fillets (such as halibut or basa), coarsely chopped
3/4 cup fresh bread crumbs.
1 egg
2 tsp Dijon mustard
1/4 tsp pepper
1 tbsp oil (I used coconut)
Lemon-Chili Mayo
1/3 cup light mayonnaise
1 1/2 tsp lemon juice
1/4 tsp chili powder
  • In a food processor, pulse together celery, green onions, and parsley until finely chopped.  Scrape into a bowl.
  • Add fish to the food processor; pulse until fine but not pureed.  Add to the parsley mixture and stir in bread crumbs, egg, mustard and pepper.
  • Divide into 8 portions and make each portion a 1/2" (1cm) thick patty.
  • In a nonstick skillet, heat oil over medium heat.  Cook fishcakes turning once, until golden and firm to the touch (aprox. 8 to 10 minutes)
  • Meanwhile, whisk together mayonnaise, lemon juice and chili powder.  
  • Serve fishcakes with a side of mayo and ENJOY!
*Coat the fishcakes in 1/3 cup medium or fine ground cornmeal.  Cook as directed for a crispy cornmeal version!

Monday, May 6, 2013

Cheesy Mushroom Enchiladas

For "Cinco de Mayo" we decided to celebrate our adopted country's Independence Day by whipping up a Mexican feast!!  This was one of the menu items and it was delicious and simple - admittedly this is not an original recipe, but rather one from Rachel Ray.  I used the fresh mushrooms and onions from this week's CSA box from Cooper's Farm and the result was heavenly!!!

CHEESY MUSHROOM ENCHILADAS
Ingredients:
1 lb white mushrooms, sliced
1/4 cup of EVOO 
2 cups shredded cheese (I used goat cheddar but try monterey jack)
Salt, to taste
1 large white onion, chopped
2 tbsp chili powder
4 tsp ground cumin
1 can tomato sauce (15 oz), although homemade is best!
8- 6" soft corn tortillas
  • Preheat the oven to 400F. Brush some olive oil in a 9 x 12 baking dish and set aside.
  • In a large skillet, saute the mushrooms in 2 tbsp of olive oil over medium heat.  Stir occasionally until the mushrooms are a lovely golden colour. (Approx 15 mins)  Remove from the heat and toss them in a bowl with 1 1/2 cups of cheese.  Season with salt and set aside.
  • In the same skillet, cook the onion in the remaining olive oil over medium high heat, stirring until lightly golden. (Approx 6 to 8 mins).  Add the chili powder and cumin and stir well for 2 minutes.  Add the tomato sauce plus 1/2 cup water.  Simmer until the sauce thickens.
  • In the greased baking dish pour 1/3 cup of the tomato sauce in the bottom.  Coat the tortillas in some sauce to make them pliable and to absorb the yummy flavours of the sauce.  Place 1/3 cup of the mushroom mixture down the centre of the tortilla, roll up and place in the baking dish.  Once you have repeated this with all 8 tortillas, top them with the remaining sauce and sprinkle the remaining cheese over top.  Place into the heated oven and bake for 15 minutes, or  until bubbly.
  • ENJOY!! 

Tuesday, April 2, 2013

Curried Crab with Coconut and Chili

So good that Emeli wore it!
The boys digging in like savages!
 Greg and I were watching the "Food Network" and Chef Curtis Stone came on to discuss the best dish he has ever made.  It looked so yummy and easy that we decided to give it a go!  We even went so far as to cover our table with a big sheet of plywood and put kraft paper on top of that for the shells!  Then we invited our friends Mike and Emeli over and feasted!!!!  It is delicious and I think this sauce would be excellent with fish, shellfish, chicken, veggies or even beef!!!!  DO NOT skimp on toasting and grinding the whole spices ~ the flavour that is produced is what makes this dish!!!!

CURRIED CRAB WITH COCONUT & CHILI
Ingredients:
2 1/4 lbs live crab (we used blue crab)
1/4 cup whole coriander seeds
1 1/2 tbsp cumin seeds
1 tbsp whole black peppercorns
Sea salt, to taste
2/3 cup white wine vinegar
1/4 cup desiccated unsweetened coconut flakes
1 tbsp finely grated fresh ginger
5 garlic cloves
1 white onion, chopped
1 large green chile, chopped roughly
1 tbsp coconut oil (or olive)
1 medium ripe tomato, diced
10 fresh curry leaves (didn't have this so I used 2 tbsp hot curry powder)
2 tsp turmeric
1 tbsp chili powder
1 can of unsweetened coconut milk
  • Place the crab in the freezer for 2 hours, or until it stops moving (this is really a humane way of killing them because they just go to sleep ~ especially if you are squeamish about killing them!  Otherwise buy frozen!!)  Remove the legs and crack them with a rolling pin.  Remove the top fo the shell and clean out the insides with your fingers.  Chop the crab and top shells in half.
  • Heat a medium skillet over medium heat.  Add the coriander seeds, cumin seeds, and peppercorns.  Stir constantly until they become fragrant and toasted, approx 3 to 4 minutes.  Cool completely.
  • To make the paste, grind the toasted seeds with a pinch of salt using a mortar and pestle or a spice grinder.  Transfer this dry mixture to a food processor and add the vinegar, coconut flakes, ginger, garlic, chile and onions.  Blend to form a paste.  
  • Heat the oil in a large Dutch oven over low heat.  Add the paste and saute until fragrant and some of the juices evaporate, approx. 5 to 10 minutes.  Add the tomato, curry leaves, turmeric, chili powder, and a pinch of salt and cook until the tomato are tender and melting into the sauce, approx 5 mins.  Add the crab and 1/2 cup water, increase the heat to medium and bring to a boil.  Reduce the heat to low and simmer until the crab pieces are cooked through, approx 10 mins.  Mix in the coconut milk and simmer for 2 to 3 mins to allow flavours to blend.  DO NOT boil the coconut milk as it will split.
  • Place the crab either directly on your kraft paper or on a big platter and dig in!!!


Thursday, February 7, 2013

Rockin' Moroccan Stew

Years ago I discovered this stew recipe in my "Crazy Plates" cookbook and I had forgotten about it until we recently went to a friend's Moroccan-themed dinner party!  It is simple, nutritious, filling, delicious and low fat....what more could you want?!?!

ROCKIN' MOROCCAN STEW
Ingredients:
2 tsp olive oil
1 cup chopped onions
1/2 cup each of diced celery and chopped green bell pepper (I only had orange for the dish pictured!)
1 clove garlic, minced
3 cups vegetable broth
3 cups peeled, cubed sweet potatoes
1 can (19oz) diced tomatoes, drained
1 can (19 oz) drained and rinsed chickpeas
1 tbsp lemon juice
2 tsp grated fresh ginger
1 tsp each of ground cumin, curry powder, ground coriander, and chili powder
1/2 tsp salt
1/4 tsp black pepper
1/4 cup raisins (I didn't have any so I used dried cranberries)
2 tbsp each light peanut butter, and chopped fresh cilantro
  • Heat olive oil in a large Dutch oven over medium high heat.  Add onions, celery, green pepper, and garlic.  Cook and stir until vegetables begin to soften (approx. 3 minutes)
  • Add all remaining ingredients, except raisins, peanut butter and cilantro.  Bring to a boil.  Reduce heat to low and simmer, covered, for 20 minutes.
  • Stir in raisins, peanut butter and cilantro.  Mix well.  Simmer for 5 more minutes.
  • ENJOY!            

Wednesday, February 16, 2011

Chicken Tikka Masala

India LOVES chickpeas and enjoys spicy foods so since pulses and legumes are recommended on her diet, I decided to use up some leftover chicken and create a version of the traditional Indian dish, Chicken Tikka Masala!  I have included the recipe for the basmati rice as well!!!  Hope you like it as much as my family (and India's friend!) did!!!
CHICKEN TIKKA MASALA
Ingredients:
2 cups sliced, cooked chicken
I can chickpeas, drained and rinsed
4 tbsp olive oil
2 onions, thinly sliced
1-1" piece of fresh gingerroot, freshly grated
2 garlic cloves, minced
6 cardamom pods, bruised*
2 tsp garam masala
2 tsp ground coriander
1 tsp chili powder, or to taste
1 can of low fat coconut milk
2 tbsp tomato paste
4 tbsp hot water
1/2 tsp salt
1/2 tsp stevia or agave syrup
Chopped fresh coriander, for garnish
Juice of half a lime
  • Make the sauce by heating the oil in a large skillet, add the onions, ginger and garlic and cook over medium heat, stirring frequently, for approximately 5 minutes or until softened but not coloured.
  • Add the spices and fry, stirring for 1 to 2 minutes, until fragrant, then add the coconut milk, tomato paste, water, salt and stevia.  Bring slowly to a boil over medium-high heat and then lower to a simmer.  
  • Add the chicken and saute for 10 minutes or less (until the chicken and chickpeas are warmed through)
  • Serve over top the basmati rice and garnish with chopped coriander and squeeze lime juice over top!
* to bruise the cardamom pods, simply lay them on a chopping board and with the flat side of your knife, press downwards (much as you would to remove garlic skins).  They are a relative of ginger and the seeds are what emit the aroma. If you are not fond of cardamom, just omit from this recipe!*

SAFFRON BASMATI RICE
Ingredients:
1/2 tsp saffron threads
3 cups boiling water
1/4 cup olive oil
2 large onions, sliced thinly
1 1/2 cups basmati rice, rinsed through a strainer
1 tsp whole cloves
4 whole cardamom pods
1 tsp salt
1 tsp freshly ground black pepper
  • Put the saffron threads in a small bowl with 1 tbsp of the boiling water and leave to soak for 20 to 30 minutes.  Heat the oil in a large heavy-bottomed pot and add the onions.  Saute for 4 to 5 minutes until softened.
  • Add the rice to the onions in the pan and stir in the cloves, cardamom, salt and pepper.  Saute 3 minutes, stirring frequently.
  • Pour the remaining boiling water into the pan, together with the saffron and its soaking liquid, then lower the heat and simmer for 15 to 20 minutes, until rice is cooked.
  • Drain well and transfer the rice to a serving dish. ENJOY!

Saturday, October 16, 2010

Creamy Turkey & Apple Chili

As it is harvest time here and we just had Thanksgiving, I had apples and turkey a-plenty!  This recipe is one that I have made for years and love.  It is deceiving because it appears to be just creamy and bland...but it really packs a lovely heat which is surprising and delicious!!  I made a double-batch for a dinner party we had last night and everyone loved it!!

CREAMY TURKEY & APPLE CHILI
Ingredients:
1/4 cup EVOO
2 lbs of turkey meat, cut into 1/2" cubes
4 tsp chili powder
2 tsp ground cumin
Dash of cayenne (if you like it a little on the hot side!)
Salt & pepper, to taste
2 apples, peeled and cut into 1/2" cubes
1 onion, diced
4 tbsp butter
1/4 cup all-purpose flour
2 cups homemade chicken broth (or turkey)
3/4 cup milk
Two 15oz cans of white kidney beans, chickpeas, or Romano beans, drained and rinsed
2 cups shredded Monterey Jack or Asiago cheese
  • In a large Dutch oven, heat 2 tbsp olive oil over medium-high heat.  Add the turkey, chili powder, cayenne (if using), and cumin.  Season with salt and pepper and cook, stirring, for 5 mins.  Transfer to a bowl.
  • In the same pot heat the remaining 2 tbsp oil.  Add the apples and onion and saute until soft, stirring constantly. Approximately 6 mins.  Add to the turkey mixture.
  • In the same pot, melt the butter over medium-low heat.  Whisk in the flour and cook for 1 minute, stirring constantly.  Whisk in the chicken (or turkey) broth and milk until thickened, approx. 3 mins.
  • Stir in the turkey-apple mixture and beans.  Bring to a simmer, then stir in the cheese.
  • Serve with cornbread muffins, tortilla chips, or crusty bread!
  • ENJOY!!!

Friday, August 6, 2010

Cauliflower and Cilantro 'Rice'

This simple and delicious recipe comes from a nutritionist who is also a member of "Cooper's CSA Farm & Maze's" CSA program. It is an easy side dish that gives the satisfaction of a couscous or rice, but is much lighter because it's not carb-rich!

CAULIFLOWER & CILANTRO 'RICE'
Ingredients
1 medium head of cauliflower, chopped fairly small
2 tbsp olive oil
2 cloves finely chopped garlic
Juice of a half a lime
¼ cup chopped cilantro
½ teaspoon chipotle chili powder (regular chili powder will also work fine)
Kosher Salt and freshly ground black pepper, to taste
  • Put all of the cauliflower in a food processor and pulse until it resembles rice grain or couscous – you may need to toss it around in the food processor a couple of times.
  • Heat the olive oil on medium in a pan with chopped garlic just until the garlic is fragrant. Add the cauliflower bits, lime juice and chili powder and cook on medium high heat until cauliflower is “al dente”. You’ll need to keep it moving so that it doesn’t burn. If you like it a bit softer or stickier you can add some veggie or chicken broth as this will “stick” the cauliflower together a bit better.
  • Once it’s cooked to your desired texture, toss in the cilantro and season with salt and pepper.
This is also really nice cold on a salad or put into a veggie wrap!

Wednesday, June 23, 2010

My New Pressure Canner & Beef Barley Soup/Hearty Chili


Well I decided, after looking at my brimming freezer full of Cooper's beef, pork and chicken, that I need to figure out another way to preserve these low acid foods. Although I love my freezer, if left too long, meat gets freezer burnt and unusable. Last year I did a tremendous amount of traditional canning and our family and friends have benefited from the wonderful jams, chutneys, sauces and pickles that I made...so why not figure out a way to preserve whole meals and have the ULTIMATE in convenience foods?
I knew about pressure canners from my Bernardin book, but had never actually seen one (the stores are full of pressure cookers, but don't mistake the two!) Foods that are low in acid, such as homemade soups, sauces, vegetables, meat, fish and seafood require heat processing at higher temperatures than that of boiling water to prevent growth of spoilage organisms that can lead to botulism, which is a deadly form of food poisoning. Low acid heat processing times have been established using pressure canners (large vessels). Pressure cookers differ in design and function from pressure canners and are therefore, not suitable for home canning!!
Finally in Canadian Tire I found my 22qt. weighted gauge pressure canner for $129. I balked a little at the price, but then reasoned that I will now be able to create chilis, stews and a variety of soups and have them shelf stable...and at hand to create a nutritious meal for my family in a moment's notice (and frankly my time is definitely worth the money!!)
The nicest thing about pressure canning is that you use such a high temperature to preserve the food, that there's no need to sterilize your jars and lids ~ what a time saver! I just dish washered them and filled them as with normal canning (putting the lids and rings in hot water, wiping down the rims of the jars and then placing the lids on the jars finger tight). The rest was so easy that I wondered what I was worrying about all this time?!
BEEF BARLEY SOUP
Ingredients:
2 tbsp EVOO
1 lb stewing beef, trimmed and cut into 1" cubes
2 tbsp all-purpose flour
2 onions, chopped
3 cloves garlic, minced
2 carrots, chopped
2 stalks of celery, chopped
1 tsp dried thyme
1/2 tsp crumbled dried sage
5 cups homemade beef stock (or low sodium)
1/2 cup red wine
1 can (19oz) chopped tomatoes
2 cups water
1/2 tsp freshly ground black pepper
1/4 tsp salt (or to taste)
1/2 cup pearl or pot barley (both are polished and can be used interchangeably)
  • In a large Dutch oven, heat oil over medium-high heat. Toss the beef cubes with the flour and in batches, brown all over. Transfer each batch to a plate and drain any fat from the pot.
  • Increase heat to high and saute the onions, garlic, carrots, celery, thyme and sage. Stir often for approximately 2 minutes or until the vegetables are softened and light brown.
  • Stir stock and wine into pot and cook for 1 minutes, stirring and scraping up any brown bits from the bottom of the pot. Add the beef, tomatoes, water, pepper and salt. Bring to a boil, reduce heat and simmer covered for 1 1/2 hrs, or until the beef is tender.
  • Add the barley, cover and simmer for 30 minutes more, or until tender.
  • ENJOY!

HEARTY CHILI

Ingredients:

4 lbs stewing beef, trimmed and cut into 1/2" cubes

1/4 cup EVOO

3 cups diced onions

2 cloves garlic, minced

5 tbsp chili powder

2 tsp each cumin seed and salt

1 tsp dried oregano

1/2 tsp each pepper, ground coriander, crushed red pepper flakes

6 cups undrained and chopped tomatoes

  • In a large pot, heat oil over medium-high heat. Brown beef in batches and remove to a plate. Drain excess oil from pot.
  • Saute onions and garlic in pot until soft (1 to 2 minutes). Add remaining spices and cook for 5 minutes. Add beef, tomatoes and stir, scraping up any browned bits from the bottom of the pot.
  • Boil gently, uncovered, for 45 to 60 minutes, stirring occasionally.
  • *If canning add the pinto or kidney beans when reheating, otherwise add at this point for 5 to 10 minutes.

If canning jars are warm ensure that the chili or soup is hot, otherwise both are to be room temperature. Place rack in the bottom of the pressure canner and add the recommended amount of hot water for warm jars, or room temperature water for cooler jars, to the bottom of the canner. After wiping the rims of the jars and firmly tightening the lids, place the jars on the rack. If you have enough 500mL jars to be processed, place a second rack on top of the first layer of jars and continue placing the jars in the canner. Tighten the lid and follow the manufacturers instructions for venting (10 minutes without gauge, then add gauge at the appropriate pressure). Process 500mL jars for 75 minutes, or 1L jars for 90 minutes. Once processing is complete, shut off the heat and allow the canner to completely cool ~ DO NOT ATTEMPT TO LOOSEN THE LID BY COOLING THE CANNER OR BANGING ON THE LID! Remove jars without tilting and cool upright and undisturbed for 24 hours. DO NOT RETIGHTEN SCREW BANDS!! After cooling check jar seals (which should be curved downwards, or they need to be processed immediately), remove screw bands and wipe dry. Replace bands if desired, label jars and store in a cool, dark place.

*Note: Canned foods should be used within one year of processing - make sure that you rotate your jars to ensure the oldest dates are in the front of your cupboard!